Tying a tie is a valuable skill that adds polish to any formal or professional look. Whether you’re preparing for a job interview, wedding, or business meeting, mastering a classic tie knot can boost your confidence and style. This guide covers three popular tie knots—the Four-in-Hand, Half-Windsor, and Windsor—with clear, beginner-friendly instructions. Each knot is explained with SEO-friendly details to help you choose the right one for any occasion.
Why Learn to Tie a Tie?
A well-tied tie elevates your appearance and shows attention to detail. Different knots suit different collar styles and occasions, from casual to formal. Learning to tie a tie ensures you’re ready for any event while expressing your personal style.
Before You Start: Tips for Success
- Choose the Right Tie: Silk or polyester ties are easiest for beginners. Ensure the tie is clean and wrinkle-free.
- Use a Mirror: Stand in front of a mirror to see your progress.
- Adjust the Length: The tip of the tie should reach your belt buckle when tied.
- Practice: Tying a tie takes practice, so be patient and try a few times.
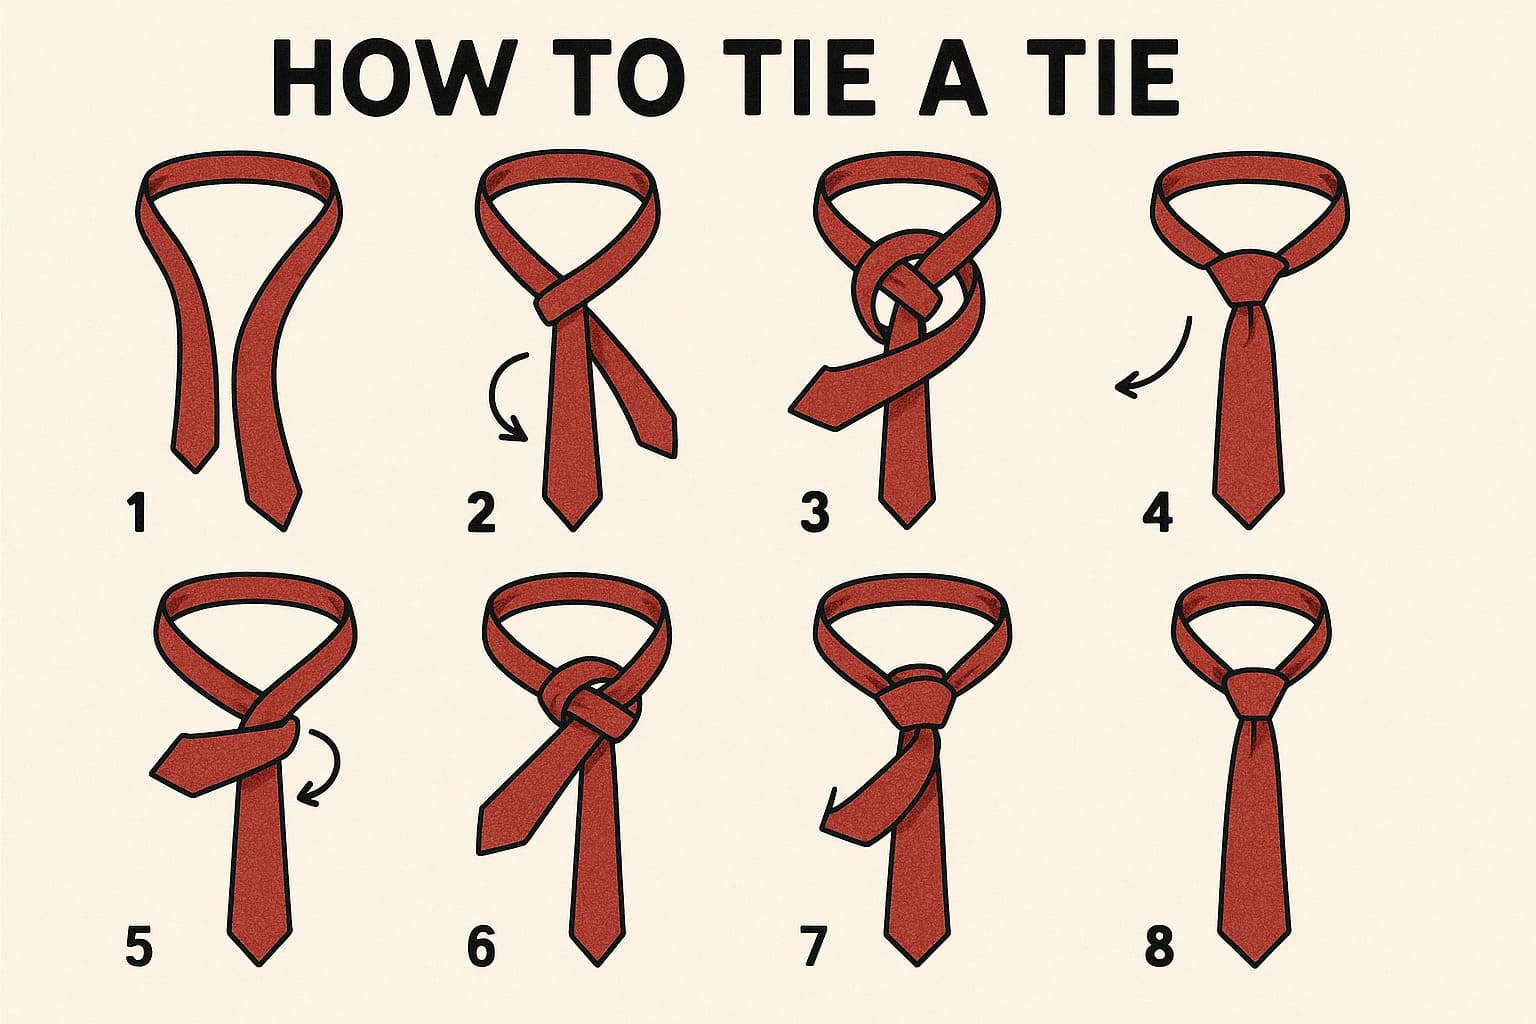
Knot 1: Four-in-Hand (Simple and Versatile)
The Four-in-Hand is a classic, slightly asymmetrical knot that’s easy to learn and works with most collars and occasions.
Steps to Tie a Four-in-Hand Knot
- Start with the Tie Around Your Neck: Drape the tie over your neck with the wide end on your right side, hanging about 12 inches lower than the narrow end.
- Cross the Wide End Over: Take the wide end and cross it over the narrow end, forming an “X” near your neck.
- Wrap the Wide End Around: Bring the wide end behind the narrow end, then pull it to the right.
- Loop Again: Cross the wide end over the front of the narrow end again, moving left.
- Pull Through the Loop: Bring the wide end up through the loop around your neck, from underneath.
- Thread Through the Knot: Slide the wide end through the front loop you just created.
- Tighten and Adjust: Gently pull the wide end down to tighten the knot. Slide the knot up to your collar and adjust for symmetry.
Best For
- Casual or business-casual settings
- Standard or narrow collar shirts
- Beginners learning their first knot
Knot 2: Half-Windsor (Balanced and Professional)
The Half-Windsor is a medium-sized, symmetrical knot that’s more formal than the Four-in-Hand but easier than the full Windsor.
Steps to Tie a Half-Windsor Knot
- Position the Tie: Place the tie around your neck with the wide end on your right, about 12 inches lower than the narrow end.
- Cross Over: Cross the wide end over the narrow end, forming an “X”.
- Wrap Around: Bring the wide end behind the narrow end, pulling it to the right.
- Loop Upward: Pull the wide end up toward your face, through the loop around your neck.
- Cross Over Again: Bring the wide end over the front of the knot, moving from right to left.
- Pull Through the Loop: Bring the wide end up through the neck loop again, from underneath.
- Thread and Tighten: Slide the wide end through the front knot loop. Tighten by pulling the wide end and sliding the knot up to your collar.
Best For
- Business meetings or professional settings
- Spread or point collar shirts
- Medium-width ties
Knot 3: Windsor (Formal and Bold)
The Windsor, or Full Windsor, is a wide, symmetrical knot ideal for formal occasions and wide-collar shirts.
Steps to Tie a Windsor Knot
- Set Up the Tie: Drape the tie around your neck, wide end on the right, extending about 12 inches below the narrow end.
- Cross the Ends: Cross the wide end over the narrow end, forming an “X” near your neck.
- Pull Through the Loop: Bring the wide end up through the neck loop and pull it down to the right.
- Wrap Behind: Bring the wide end behind the knot, pulling it to the left.
- Loop Up Again: Pull the wide end up through the neck loop, then down to the left.
- Cross the Front: Bring the wide end over the front of the knot, moving from left to right.
- Pull Through Again: Bring the wide end up through the neck loop from underneath.
- Finish the Knot: Slide the wide end through the front loop. Tighten by pulling the wide end and adjusting the knot.
Best For
- Weddings, formal events, or presentations
- Wide spread-collar shirts
- Thicker or wider ties
Choosing the Right Knot
- Four-in-Hand: Slim and slightly asymmetrical, perfect for casual or semi-formal looks.
- Half-Windsor: Medium-sized and balanced, ideal for professional settings.
- Windsor: Large and bold, suited for formal occasions and wide collars.
Common Mistakes to Avoid
- Wrong Length: If the tie is too long or short, adjust the starting position of the wide end.
- Loose Knot: Tighten the knot gently to avoid wrinkles and ensure it sits snugly against your collar.
- Mismatched Collar: Pair the knot size with your shirt collar—smaller knots for narrow collars, larger knots for wide collars.
FAQs
The tip of the tie should reach your belt buckle or waistband when tied. Adjust the starting length if needed.
Yes, but it’s trickier. Follow the same steps, but mirror your movements as if you’re tying it on yourself.
The Four-in-Hand is the simplest and quickest knot to learn, making it ideal for first-timers.
Untie it carefully after wearing, hang it to avoid wrinkles, and store it rolled or flat. Spot-clean stains with a damp cloth.
Conclusion
Learning to tie a tie is a timeless skill that enhances your style and confidence. Whether you choose the simple Four-in-Hand, the professional Half-Windsor, or the formal Windsor, practice makes perfect. Start with one knot, master it, and experiment with others to suit different occasions. For visual guidance, check out video tutorials on platforms like YouTube or visit The Art of Manliness for more style tips.
Happy tying, and rock that sharp look!
Also read:
Trust Post Desk
A journalist and editor at TrustPost.org covering world and national news, technology updates and human-interest stories. They check every fact, interview sources in person or online, and aim to deliver clear, accurate reporting. Their work ranges from breaking news to in-depth features and daily newsletters. Outside the newsroom, they follow emerging trends and engage with readers on social media.