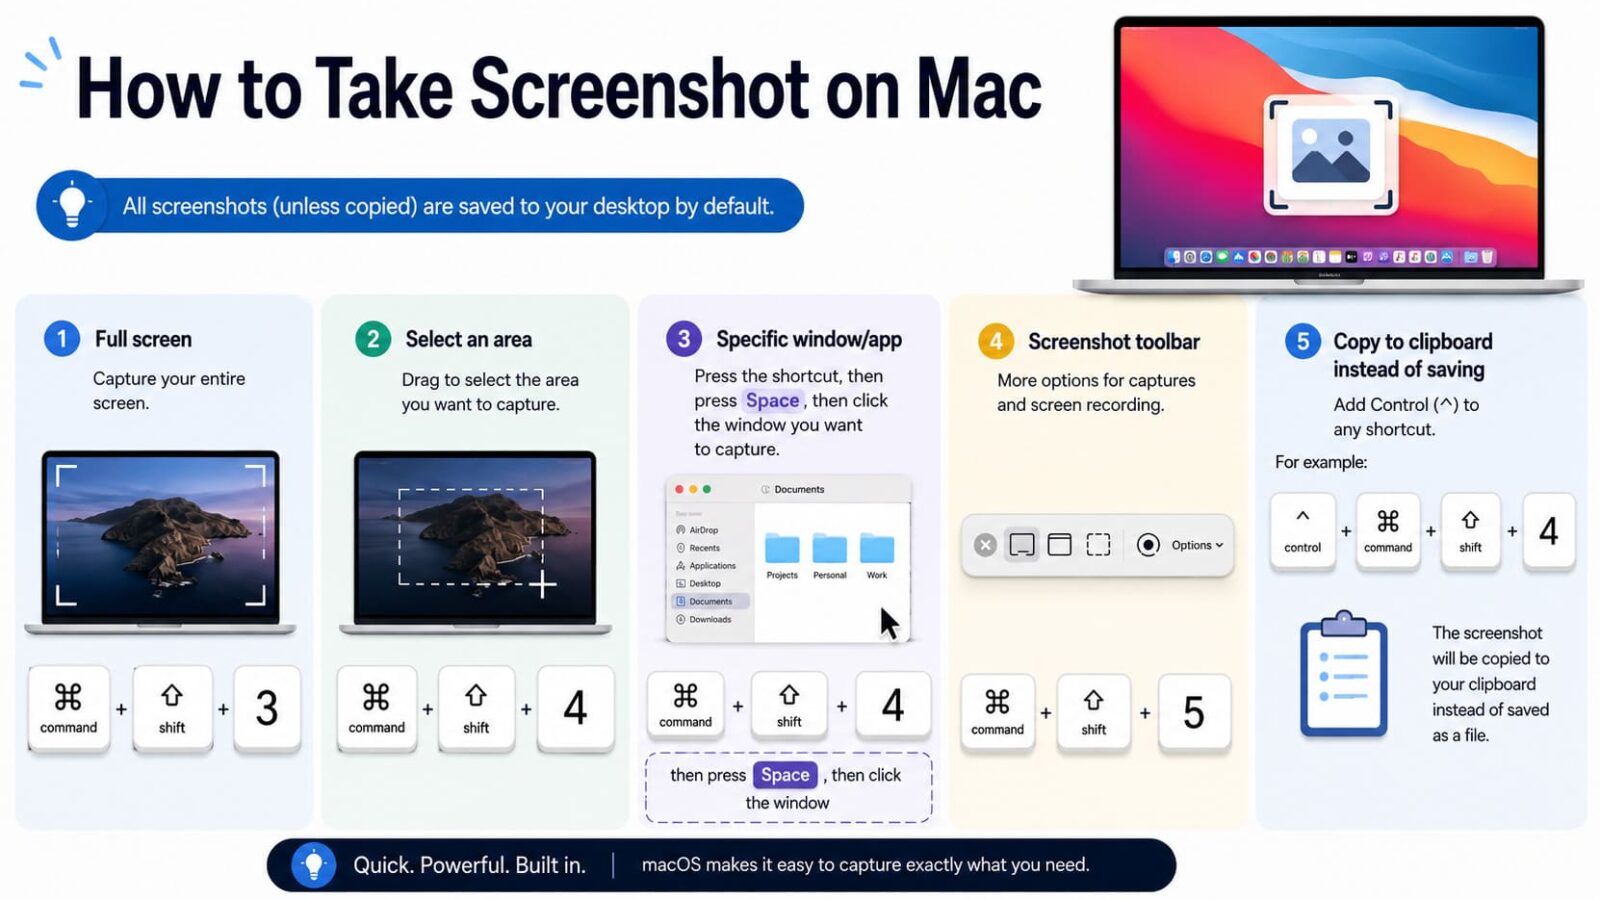
If you just need the shortcuts, here they are:
- Full screen: Command (⌘) + Shift + 3
- Select an area: Command (⌘) + Shift + 4
- Specific window/app: Command (⌘) + Shift + 4, then press Space, then click the window
- Screenshot toolbar (more options + screen recording): Command (⌘) + Shift + 5
- Copy to clipboard instead of saving: add Control (⌃) to any shortcut (for example ⌃⌘⇧4)
Where Mac screenshots save (and how to change it)
By default, macOS saves screenshots to your Desktop. To change the save location:
- Press ⌘⇧5 to open the screenshot toolbar.
- Click Options.
- Under Save to, pick a folder (Desktop, Documents, Clipboard, Mail, Messages, Preview) or choose Other Location…
Tip: If you pick Clipboard, your Mac screen capture won’t create a file—just paste it with ⌘V into an email, doc, or chat.
How to take a screenshot on Mac (step-by-step)
1) Take a full-screen screenshot
- Press ⌘⇧3.
- Look for the thumbnail preview in the bottom-right corner (if enabled).
- Click the thumbnail to edit, or let it save automatically.
2) Take a selected-area screenshot (most common)
- Press ⌘⇧4.
- Click and drag to select the area you want to capture.
- Release the mouse/trackpad to take the screenshot.
Precision controls while selecting:
- Hold Shift to lock the selection (helpful for straight edges).
- Hold Option (⌥) to resize from the center.
- Hold Space to move the selection box before you release.
3) Take a screenshot of a window (clean app capture)
- Press ⌘⇧4, then press Space.
- Your cursor turns into a camera icon.
- Hover to highlight a window, then click to capture it.
Note: macOS may add a shadow around window screenshots. If you need a cleaner look, you can remove the shadow with a Terminal setting (see the “Advanced” section below).
Use the Screenshot toolbar (⌘⇧5) for the most control
The screenshot toolbar is the best option when you want to pick a save folder, use a timer, include the pointer, or record your screen.
Open it: press ⌘⇧5.
- Capture Entire Screen
- Capture Selected Window
- Capture Selected Portion
- Record Entire Screen
- Record Selected Portion
Click Options to set:
- Timer: None / 5 seconds / 10 seconds
- Save to: Desktop, Documents, Clipboard, or a custom folder
- Show Floating Thumbnail (quick edit after capture)
- Remember Last Selection (great for repeated captures)
How to crop a screenshot on Mac
You can crop immediately, or later—both are fast.
Option A: Crop right after you capture (fastest)
- Take a screenshot.
- Click the thumbnail preview (bottom-right).
- Click the Crop tool (or drag the corners/edges if shown).
- Click Done (or Save depending on macOS version).
Option B: Crop using Preview
- Double-click the screenshot file to open it in Preview.
- Click and drag to select the area you want to keep.
- Go to Tools → Crop.
- Press ⌘S to save.
Edit and annotate screenshots (highlight, blur, arrows, text)
For quick edits, click the screenshot thumbnail right after capturing and use Markup:
- Text (labels, notes)
- Shapes (boxes, circles, arrows)
- Highlight (draw attention)
- Blur/Pixelate (hide sensitive info like emails or IDs)
If the thumbnail is off, open the image in Preview and click the Markup icon.
Copy a Mac screen capture to clipboard (no file created)
This is ideal for Slack, email, Google Docs, Notion, and support tickets.
- Copy full screen: ⌃⌘⇧3
- Copy selected area: ⌃⌘⇧4
- Copy window: ⌃⌘⇧4, then Space, then click window
Then paste with ⌘V.
Advanced tips (file type, naming, no shadow)
If you’re comfortable with Terminal, these can improve your workflow.
Change screenshot file format (PNG, JPG, PDF)
defaults write com.apple.screencapture type jpg
killall SystemUIServer
Replace jpg with png, pdf, tiff, or gif.
Remove the shadow from window screenshots
defaults write com.apple.screencapture disable-shadow -bool true
killall SystemUIServer
To turn it back on, change true to false.
Change the default screenshot folder (Terminal)
mkdir -p ~/Pictures/Screenshots
defaults write com.apple.screencapture location ~/Pictures/Screenshots
killall SystemUIServer
Troubleshooting: screenshots not working on Mac
- Nothing happens when you press shortcuts: check System Settings → Keyboard → Keyboard Shortcuts → Screenshots and confirm they’re enabled.
- Can’t find your screenshots: open ⌘⇧5 → Options and confirm Save to. Also search in Finder for “Screenshot”.
- No thumbnail preview: open ⌘⇧5 → Options and turn on Show Floating Thumbnail.
- Work Mac restrictions: some device management policies can disable screen capture—try the Screenshot toolbar (⌘⇧5) and contact IT if it’s blocked.
FAQs
Same shortcuts: ⌘⇧3 (full screen), ⌘⇧4 (area), ⌘⇧5 (toolbar).
On Touch Bar models: ⌘⇧6 captures the Touch Bar.
Press ⌘⇧5, choose Record Entire Screen or Record Selected Portion, then click Record.
Quick recap
- Use ⌘⇧4 for most screenshots (fast + precise).
- Use ⌘⇧5 for save location, timer, and screen recording.
- For “paste-only” captures, add Control (⌃).
Trust Post Desk
A journalist and editor at TrustPost.org covering world and national news, technology updates and human-interest stories. They check every fact, interview sources in person or online, and aim to deliver clear, accurate reporting. Their work ranges from breaking news to in-depth features and daily newsletters. Outside the newsroom, they follow emerging trends and engage with readers on social media.